Norbert Vischer
Bacterial Cell Biology
University of Amsterdam

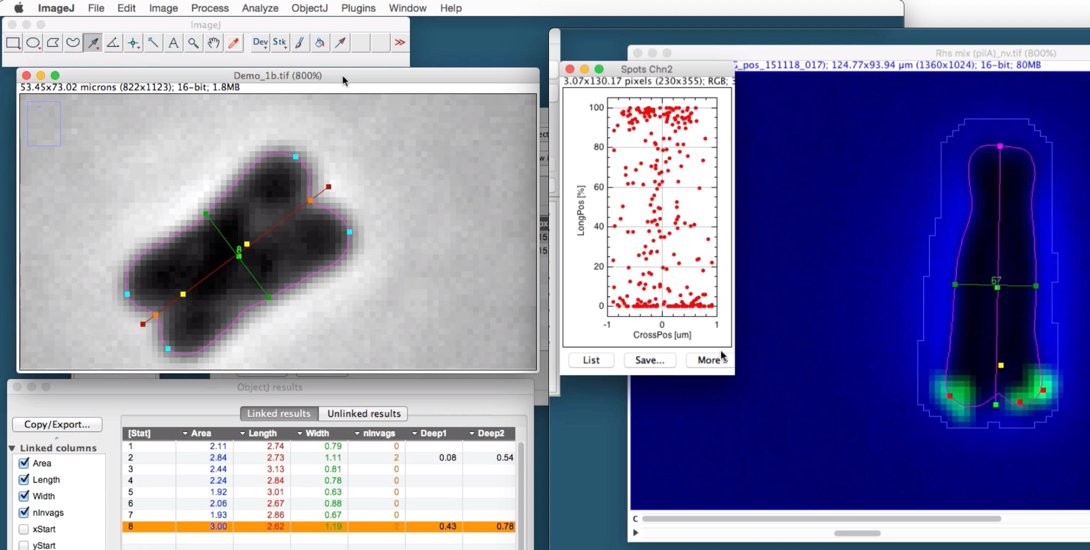
XY-Shape-Inspector analyses longitudinally dividing bacterial cells that are imaged in phase contrast and fluorescence channels. During their entire life, these bacteria are connected with one pole to the skin of their host worm. During division, the cell first appears as Y- and then as X-shape, which gave the name to our method. We use ImageJ in combination with plugin ObjectJ, which can bundle different marker types per cell and is optimised to analyse cell populations across many hyperstacks.
Precursor: The ThioBac Tester
Before developing XY-Shape-Inspector, we created a test macro called ThioBac Tester to study methods for shape analysis. The "ThioBac-Tester" can still be used. It does not require the ObjectJ plugin.
In phase contrast, the cell is temporarily scaled-up to a resolution of 10 nm per pixel and thresholded to obtain the cell's outline. The outline is interpolated to a vector polygon and downscaled to the original image. Along the cell perimeter, the curvature for each vertex is measured, where negative values correspond to concave parts. The contour is then subdivided into four sections: two lateral and two polar regions. The curvatures of the polar regions are tested for extrema. Where the curvature minimum is below a predefined level, a polar invagination is marked, and the two adjacent curvature maxima are marked as sister poles. If no polar invagination is found, the cell pole is marked at its curvature maximum.
An additional feature is the detection of "deep" invagination. It uses the contour information to further detect a bright band along either end of the cell axis. It senses the start of the cell division which is not reflected by the contour yet. In order to find the deep invagination, we define a "sensor line" that connects the two markers for sister poles. The intensity profile of this line is searched for a significant maximum. As long as such a maximum is found, the sensor line is moved deeper towards the cell center. The position of the last found maximum is called the "deep invagination".
In the fluorescence channel, foci are measured and associated to the corresponding contour. For this, the contour is temprarily expanded by 0.3 um in order to tolerate imprecisions caused by the PSF and acquisition errors.
The foci positions are expressed in local coordinates. Before doing this, it must be known which side of the cell is attached to the skin of the host worm. This is called the proximate pole, and in this application we call it the "South pole". During browsing with ObjectJ>Navigation shortcut commands, cells can be observed, discarded, or South-pole swapped. Foci of a single or all cells can be plottet into a normalized vertical cell body with a vertical long axis of 100%, while the cellwidth is measured in micrometers.
If not done yet, install ImageJ from: http://imagej.nih.gov/ij/
If the ObjectJ plugin is already visible under menu Plugins, jump to (4).
Otherwise, you can install ObjectJ as follows:
Download objectj_.jar from
https://sils.fnwi.uva.nl/bcb/objectj/download/current/
Make sure objectj_.jar was not renamed (because an older version already existed in the download folder).
Drag objectj_.jar onto ImageJ's main window (which contains the tools).
Confirm when ImageJ asks to store this plugin in the plugins folder, and relaunch ImageJ.
You can choose Plugins> ObjectJ to make the ObjectJ menu visible (see fig 2),
but the ObjectJ menu will appear anyway the first time you open an .ojj project file.
Download XY-Shape-Inspector-xx.ojj
(Note that the file names have changed since the movie was made)
Download the demo stack Rhs_mix.tif and put it into the same folder as the .ojj file
Open the .ojj file in ImageJ (it will be recognized because ObjectJ plugin is installed)
Link all images you want to analyze, in this case go to the Finder/Explorer and drag Rhs_mix.tif into "Linked Images" panel.
Choose ObjectJ>Mark Centers
Choose ObjectJ>Mark Shapes
Choose ObjectJ>Mark Spots
Choose ObjectJ>Navigate> to browse through objects using shortcuts
Choose ObjectJ>Save Project to save all data in the .ojj file