Marking and categorizing oocytes
08-may-2025
This project allows automatic and manual measurements of oocyte cells.
Resulting parameters are cell size and elliptical aspect ratio. Size
is visualized by a red line indicating the diameter of equivalent circle with same area.
A category (0..9) can be added manually, and is visualized by the "hand of a clock".
You can get statistics of any subset of objects that meets a combination of properties
A - Install ObjectJ plugin
- If not done yet, install objectj_.jar from https://sils.fnwi.uva.nl/bcb/objectj
- Move objectj_.jar into the ImageJ plugins folder by
dragging it into the ImageJ main window- so it will be saved in the correct place
- optionally, choose menu Plugins>ObjectJ
- Now the menu "ObjectJ" should appear between "Analyze" and "Plugins"
- If already installed, ObjectJ can be upgraded via: menu ObjectJ>Project>Update ObjectJ
B - Download Sample Images and .ojj project file
- Download "Oocyte-Samples" containing two sample images
- Download project file (currently 'Oocytes-35d.ojj') and move it into the project folder " Oocyte-Samples "
- Drag the .ojj file into the ImageJ main window to
open this project, wait until the project window
appears and shows the panel for "Linked Images"
(Alternatively, choose menu ObjectJ>Open Project..).
- Drag&drop the image files to be measured from the project folder
into the panel 'Linked Images', or click button 'Link All'
C - Usage
1. Automatic marking of cells
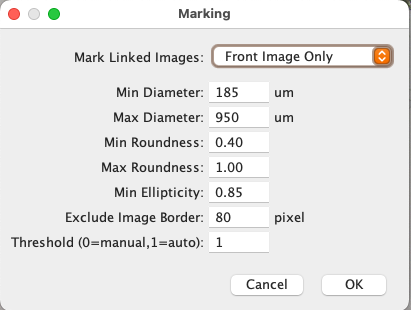
- choose menu ObjectJ>Mark Oocytes...
- In the dialog, if ‘Threshold’ is set to zero, you are asked to
threshold each image interactively, 1= automatic and >1 uses that value.
2. Categorize any marked cell
- Locate the cursor above a marked cell and press
key 0..9 for category. Cell will obtain that category as hand of a clock,
e.g. 4 o'clock means category 4.
3. Kill a marked cell
Position cursor above a cell an press key ‘K’.
Alternatively, activate in ObjectJ>Tools the ‘pistol tool’.
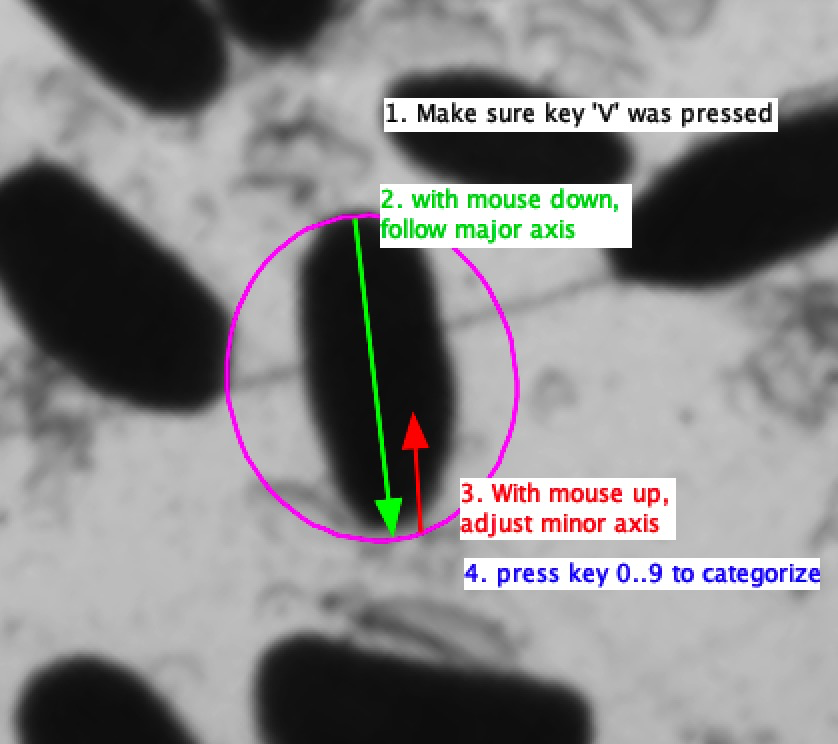
4. Mark an elliptical cell manually:
ObjectJ tool "V" nust be activated ( press key ‘V’ once or twice)-So that
Click and drag along a line A-B to follow the cell’s major axis.
After releasing the mouse button, a circular roi is shown.
Now move the cursor back towards the cell’s center to decrease the ellipse’s minor axis
Press key 0..9 to assign a category to the elliptical roi
5. Mark a cell with fixed diameter
Make the floating circle visible above a small cell (if necessary press key V once or twice),
Press key 0..9 to define thecategory:
A line of fixed length (here 185 um at 45 deg) is used to mark the existence of such a cell.
Cell will be categorized like described above
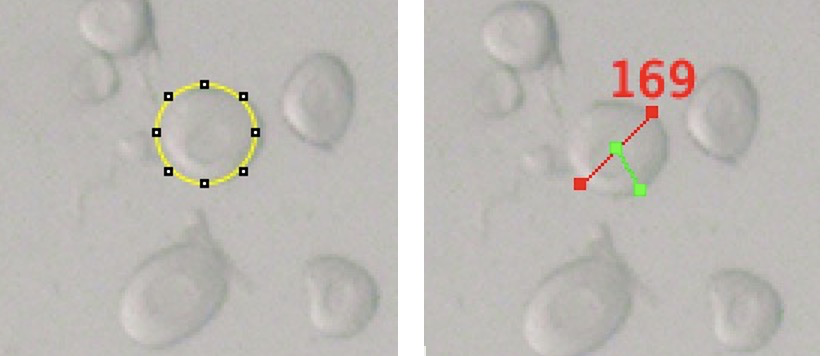
Floating circle before (left) and after categorizing with key "5" (right)
6. Show/Hide Ellipses [E]
Shows or hides the elliptical contours of marked cells.
7. Categorize Uncategorized cells...
You can set a default category to all objects that have no category yet.
This is done in all linked images.
Choose ObjectJ>Categorize all uncategorized cells...
Note: you cannot automatically undo this action!
8. Results
Choose ObjectJ>Show Project Results
to display numeric results. The following columns are implemented:
Dia equivalent diameter in um
Cat category 0..9, or -1 if uncategorized, or empty for fixed diameter
Roundn. same as Minor/Major (range 0..1)
Ellipt. ellipticity= ellipse perimeter/actual perimeter
(range 0..1, or empty for manual marking)
Minor minor axis (um)
Major major axis (um)
Area3 area (unit is 10^3 um^2 for convenience)
9. Saving
Periodically save the colored markers via menu ObjectJ>Save project.
(Note that menu "File>Save" only would save an image, not the markers)
10. Mark your own images
- Once the described sample project works satisfactory, you can save an empty copy
of the project file via ObjectJ>Project File> Save an Empty Copy.
- The empty copy contains all internal structure and macros, but no markers or linked images.
- Link your images via ObjectJ>Linked Images> Link Image from project Folder
- Make sure your linked images are scaled correctly (eg pixels per um)
11. Notes
- cells with fixed diameters don't have any quantitative result entries.
- marking a cell with "fixed diameter" does not invite to add a category
- Categorize all unmarked cells does not categorize those with fixed diameter