Norbert Vischer
University of Amsterdam
16-jul-2014
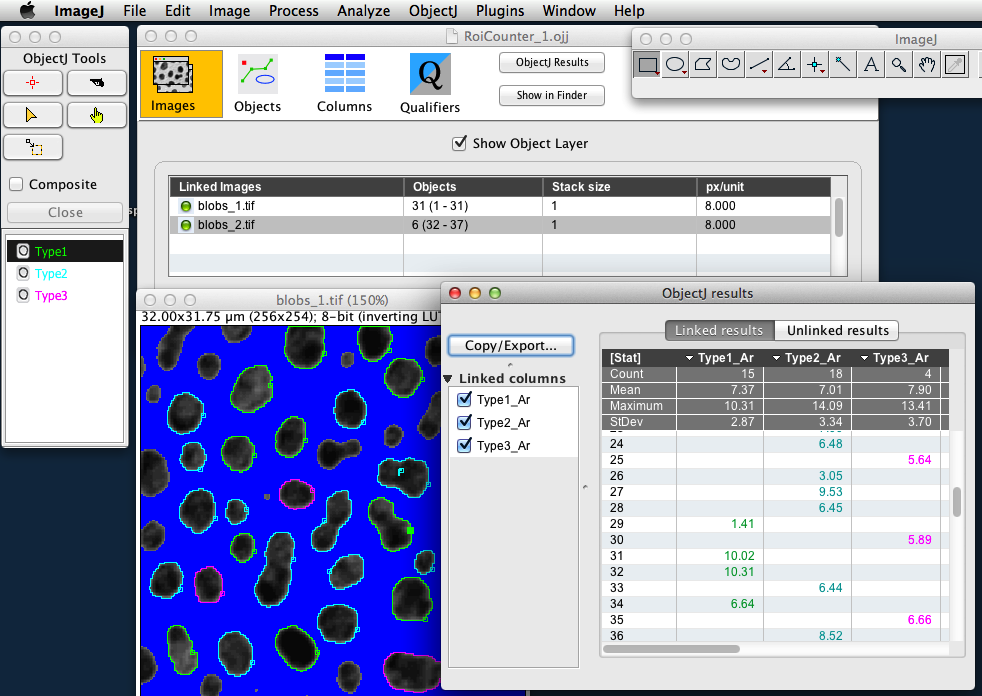
ObjectJ RoiCounter is a simple example for manual marking of differrent roi categories.
Features:
- Use keys 1..3 to mark different roi categories (extendible)
- Pistol tool for deleting markers and related results
- Mark many images or (hyper)stacks using a single project file
- No duplicates of images and no additional files are created
- Mark TIF or non-TIF files
- Adjustable names and marker types
In this example, we use three marker names Type1,Type2,Type3
for marking Blob outlines.
The linked ObjectJ Results table uses separate columns for each type
If not yet done, install ImageJ from: http://imagej.nih.gov/ij/
If the ObjectJ plugin is already installed (i.e. visible under menu Plugins), jump to (4).
Otherwise, you can install ObjectJ as follows:
In ImageJ, choose menu File> Import> URL...
and type:
simon.bio.uva.nl/objectj/download/current/objectj_.jar
ImageJ then fetches objectj_.jar and suggests to store it in the plugins folder.
Confirm by clicking the Save button, Quit and Relaunch ImageJ.
You can choose Plugins> ObjectJ to make the ObjectJ menu visible (see below),
but opening a project file with extension: .ojj will also insert this menu.

Download and unpack the demo project from:
https://sils.fnwi.uva.nl/bcb/objectj/examples/RoiCounter/download
It includes a project file (ending with .ojj) and two 'Blob' images for demonstration.
Open file RoiCounter.ojj by dragging it into the ImageJ main window (or use File> Open..)
If the ObjectJ menu was not visible yet, it should appear now.
The ObjectJ project window (see fig) indicates two linked images (blob_1.tif and blob_2.tif).
Double click e.g. on blob_1.tif to open this image for further marking.
This project contains embedded macros that appear under the ObjectJ menu:
Use the following three commands by locating the cursor above a thresholded particle,
then press one of the shortcut keys without clicking the mouse.
The macro will perform auto-outline (just as the wand would do), and converts the roi into a roi object of the desired type.
ObjectJ> Type1 [1] auto-outlines and converts roi into a "Type1" object
ObjectJ> Type2 [2] auto-outlines and converts roi into a "Type2" object
ObjectJ> Type3 [3] auto-outlines and converts roi into a "Type3" object
In all three cases, the results (area) are updated automatically.
ObjectJ> Toggle Labels [L] Shows or hides suffix overlay next to markers in front image (here: 1, 2 or 3). This may be handy if the project is extended to many types and colors are not enough to identify.
ObjectJ> Create Results Creates for each type (here 3) columns for areas (once they are created, you can use ObjectJ>Show ObjectJ Results)
ObjectJ> Choose Pistol [P] shortcut to select the pistol tool in the ObjectJ Tools for deleting objects
In Project Window> Objects Panel you can show/hide numerical labels so the don't interfere with overlay text.
Choose ObjectJ> Save Project to save the .ojj project file. You don't need to save any images.
Add a category:
itemColors= split("green cyan magenta orange"),
and add one more macro:
macro "Mark Type4 [4] " {
    doMark("Type4");
}