27-April-2016
MeiosisTool analyses meiotic interference by measuring centromere positions and MLH1 spot positions along synaptonemal complexes.
It runs in combination with ImageJ and the ObjectJ plugin.
Norbert Vischer
Bacterial Cell Biology
University of Amsterdam
Features
- computer-aided manual tracking of synaptonemal complexes.
- automatic marking of rMLH1 spots and centromeres
- measures length, spot positions and categorises ArmRatio
- full back-and-forth navigaton
If not done yet, install ImageJ from: http://imagej.nih.gov/ij/
If the ObjectJ plugin is already visible under menu Plugins, jump to (4).
Otherwise, you can install ObjectJ as follows:
Download objectj_.jar from
https://sils.fnwi.uva.nl/bcb/objectj/download/current/
Make sure objectj_.jar was not renamed (because an older version already existed in the download folder).
Drag objectj_.jar onto ImageJ's main window (which contains the tools).
Confirm when ImageJ asks to store this plugin in the plugins folder, and relaunch ImageJ.
You can choose Plugins> ObjectJ to make the ObjectJ menu visible (see fig 2),
but the ObjectJ menu will appear anyway the first time you open an .ojj project file.
Download and unpack the folder 'MeiosisTool', which contains two hyperstacks. We will use it as our 'project folder'.
Download and unpack the project file 'MeiosisTool-xx.ojj' and store it in the project folder mentioned above.
In order to open MeiosisTool-xx.ojj, you can either drag its file icon from the Finder/Explorer into the main window with title "ImageJ", or you can use ImageJ's Open menu.
If the ObjectJ menu (between Analyze and Plugins, Fig 2) was not visible yet, it should appear now.
Now the project window is shown, with the panel for linked images still being empty.
In order to link the two files demo_1.tif and demo_2.tif, go to the Finder/Explorer and drag their icons into "Linked Images" panel (Fig 2). Alternatively, you can link images via menu ObjectJ>Linked Images.
The two green bullets confirm that the image files are in the same folder as the project.
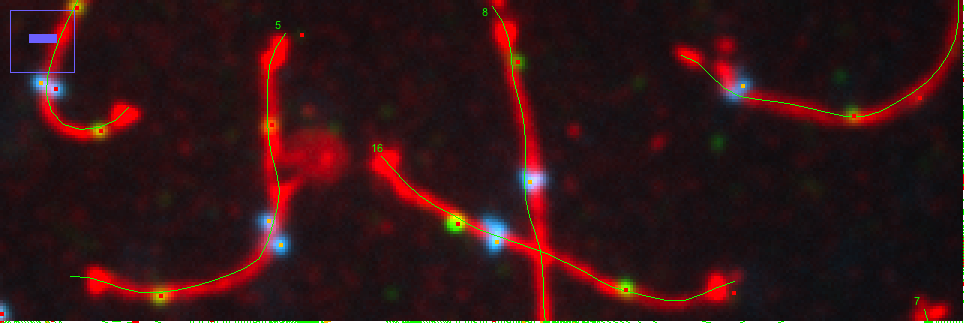
The demo files contain fluorescence images that are organised as 3-channel hyperstacks: channel 1 shows the filamentous complexes, channel 2 shows MLH1 spots, channel 3 shows centormeres.
In ObjectJ, project-specific macro commands are listed indented in the lower part of the ObjectJ menu. Here, these commands are explained in the order a user would execute them:
This command can only be invoked by typing key "1", not via menu.
Choose channel 1 (eg via keys < and >), then locate the cursor at the start of a filamentous complex without clicking the mouse, and press key 1. Then, follow with the mouse the filamentous complex.
- Axis sensor: While a segmented line selection is built up, vertices snap to the axis, so you have to follow the complex only approximately.
- Wipe-backwards: If you move the mouse in reverse direction, the segmented line will be wiped out, i.e. you can redo a part of the trajectory.
- Shift key: while the shift key is down, no new vertices are generated. This way you can temporarily avoid that the axis sensor is distracted by other structures, or by road crossings.
- Alt key: Normally, the axis sensor does not follow sharp bends, which makes tracking more robust. You can temporarily allow sharp bends by holding Alt key down. This may be neccessary at sharp U-bends.
this is done by pressing [1] a second time. A normal ImageJ segmented line selection is visible, whose vertex anchor points can be moved. You also can delete an anchor by clicking on it with the Alt key dowm.
The current segmented line selection is converted into an ObjectJ object in channel 1, which will later receive more "items" like spot markers from other channels. So far, the axis length will already appear in the ObjectJ Results.
You can automatically mark all spots in all linked images: For example:
- Mark Spot2's will automatically set "Spot2" markers into channel 2. First, a maximum tolerance slider will appaer. For example, decreasing the tolerance will show more maxima. Clicking OK will mark all images that don't contain yet any Spot2 spots. Spots are only marked if they are in vicinity of the axis markers, and will be associated to them in a single ObjectJ object.
Mark Spot3's will similarly mark spots of type Spot3 (centromeres) in channel 3, but only one spot per complex (the strongest one) will be recorded.
Unmark Spot2's will delete all Spot2 markers in all linked images.
This command can only be invoked by typing key "S", not via menu. You don't need to click the mouse. If channel 2 is active, and the cursor is close to an axis marker, a "Spot2" will be set and associated to that axis. Similarly, in channel 3, a "Spot3" marker will be set.
This command can only be invoked by typing key "D", not via menu. You don't need to click the mouse. If a spot is close to the cursor and channel 2 or 3 is selected, the spot will be unmarked.
Creates (or removes) a semi-transparent overlay of the axis, that is visible in all channels.
This is a shortcut for a function provided by Image>Color>Channels Tool. Pressing T switches between the current channel only (color), or all channels together(composite).
you can navigate to "previous", "this", or "next" object, relative to the order in which the objects appear in the ObjectJ results table (which could be descending or ascending with respect to a sorted ObjectJ result column).
initialises the ObjectJ results table to prepare the desired result columns. You only need to do this once for a project.
Calculates all derived results (for example spot positions, that appear in a row in ascending order from left to right).
Both relative and absolute spot positions are always present, but you can optionally hide them, as if you would click their checkboxes in the ObjectJ results table.