Go back to ObjectJ Examples
updated 9-jul-2018
Download demo which contains a demo image and a project file FishEggs-Cindy-61.ojj (version number may change)
In this project, fish eggs had to be measured and categorized to obtain these parameters:
Make sure that ImageJ has been started with "objectj_.jar" in the plugins folder. Currently we use ImageJ 1.52d and ObjectJ 1.04j.
Open project file "FishEggs-Cindy-61.ojj", e.g. by dragging it into the ImageJ main window
At least now, the ObjectJ menu should be visible. Check version via ObjectJ> Project> About ObjectJ. The ObjectJ menu also contains embedded macro commands specific for this project, starting with Init [F1].
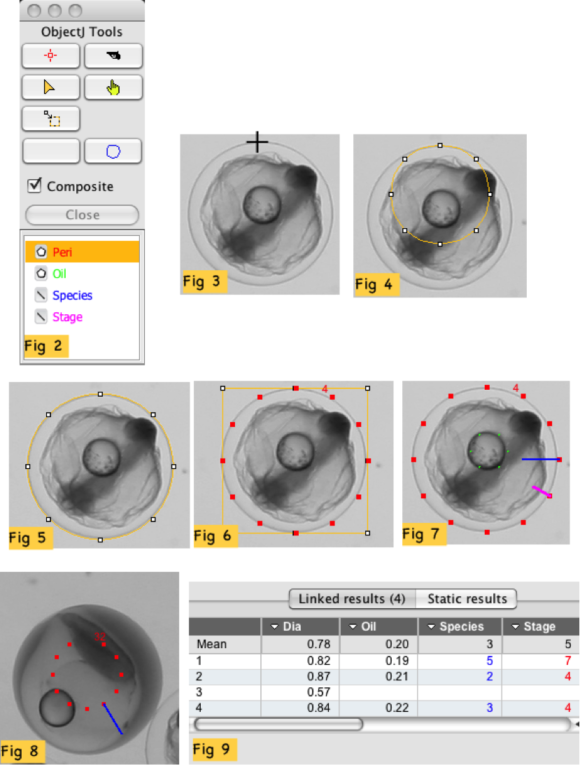
ObjectJ>Show ObjectJ Tools should now show the "Egg Tool" with the blue circle (Fig 2).
Link one or several images by dragging them from the project folder into the "Linked Images" panel.
Open the first linked image by double-clicking its name in the Linked Images panel
Choose menu ObjectJ> Init [F1]. This command de-selects any object and selects the Egg tool.
Click at the top of an egg (Fig 3) and keep mouse button down.
Optionally (if there is an oil droplet), click at the top of an oildrop and adjust size and alignment. Six green dots mark the oil droplet, being part of the previously selected object.
Now add the "Species" information by pressing key 1..9. Higher numbers are possible by starting with key 0, which displays a dialog. The object remains selected.
Assign stage information by pressing a key 1..9. The previously selected object is now complete and is deselected.
Species and stage are shown as hands of a clock, e.g. "3 o'clock" and "4 o'clock" (Fig 7). If species is > 9, the hand points to 12 o'clock. You can make the species number visible in the image by going to ObjectJ>Show ObjectJ Results, right-click the title "Species" and click "Show As Label", which will show the species number behind the object label, separated by a colon.
You can exit half way by choosing menu ObjectJ> Abort [F2]: if unfinished cell is selected, it will be deleted. To continue, you need to choose ObjectJ>Init [F1] again.
Look at results by choosing menu ObjectJ>Show ObjectJ Results.
You can change "Stage" and "Species" later by selecting the egg with the ObjectJ "Finger" tool and choose "ObjectJ>Properites of Current Object"(fig 10).
You also have the possibility to mark an egg with a fixed radius (default: 35 pixels) and only define the species number: With no object being selected (e.g. after pressing F1), position the cursor in the center of an egg without clicking. Then, for example, press key "5" to set species number to 5. See Fig. 8 for screenshot: Object #32 is marked with 11 dots, resembling a small clock with missing 12'o clock. The blue line marks the species number. In the ObjectJ results, the diameter field consequently appears empty.
Periodically choose menu ObjectJ> Save Project to save your manual work. Also, keep some older files as back-up in case something is cleared accidentally.