Norbert Vischer
University of Amsterdam
09-oct-2013
ObjectJ Cell Counter is a simple example for manual cell counting.
Features:
- Cursor color reflects current cell type
- Pistol tool for deleting markers
- Mark many images or (hyper)stacks using a single project file
- No duplicates of images and no additional files are created
- Mark TIF or non-TIF files
- Adjustable names, marker types and text labels
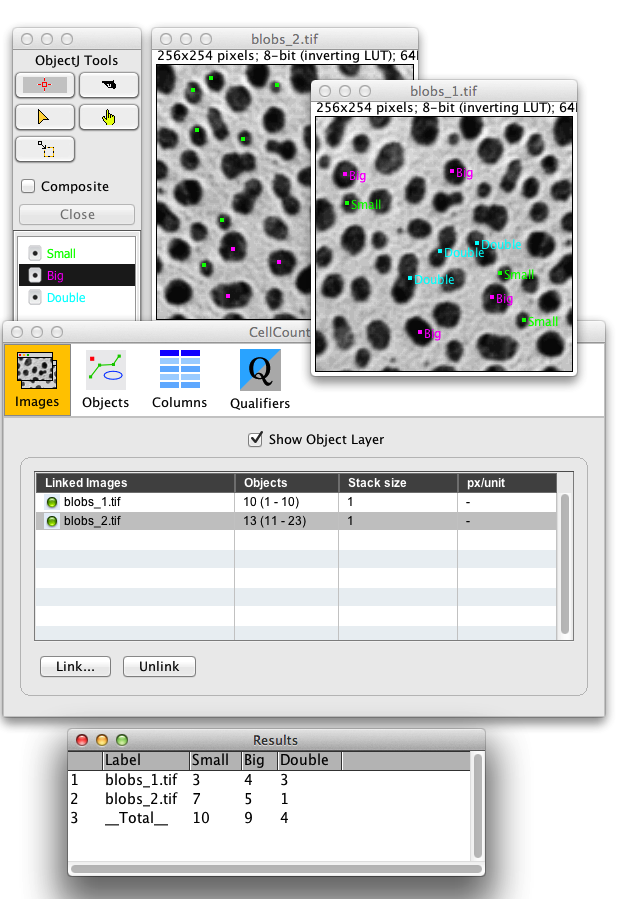
In this example, we use three marker names Small,Big,Double
for marking Blobs. The output is displayed in a simple table.
Configuring the linked ObjectJ Results table for more complex output is not described here.
If not yet done, install ImageJ from: http://imagej.nih.gov/ij/
If the ObjectJ plugin is already installed (i.e. visible under menu Plugins), jump to (4).
Otherwise, you can install ObjectJ as follows:
In ImageJ, choose menu File> Import> URL...
and type:
simon.bio.uva.nl/objectj/download/current/objectj_.jar
ImageJ then fetches objectj_.jar and suggests to store it in the plugins folder.
Confirm by clicking the Save button, Quit and Relaunch ImageJ.
You can choose Plugins> ObjectJ to make the ObjectJ menu visible (see below),
but opening a project file with extension: .ojj will also insert this menu.

Download and unpack the demo project from:
https://sils.fnwi.uva.nl/bcb/objectj/examples/CellCounter/CellCounterProject.zip
It includes a project file (ending with .ojj) and two 'Blob' images for demonstration.
Open file Cell-Counter.ojj by dragging it into the ImageJ main window (or use File> Open..)
If the ObjectJ menu was not visible yet, it should appear now.
The ObjectJ project window (see fig) indicates two linked images (blob_1.tif and blob_2.tif).
Double click e.g. on blob_2.tif to open this image for further marking.
This project contains embedded macros that appear under the ObjectJ menu:
Keyboard shortcuts [1], [2] and [3] have the same effect as selecting an item in ObjectJ Tools:
ObjectJ> Small [1]
ObjectJ> Big [2]
ObjectJ> Double [3]
ObjectJ> Update Initials [7] Draws initials next to markers in front image (here: S, B or D).
ObjectJ> Update Labels [8] Draws entire item names next to markers in front image.
ObjectJ> Remove Labels [9] Removes text labels next to markers in front image.
By default, keep these item names disabled as they are not automatically updated.
ObjectJ> Show Count Results Displays counts per image and type
Now select an item in ObjectJ Tools and place additional markers into image blob_2.tif.
.ojj project file. You don't need to save any images.
Make a duplicate of the demo project file via ObjectJ> Project> Save an Empty Copy..
(let's call it: MyProject.ojj) and store it in the same folder as your images to be marked.
Open MyProject.ojj (this will close the previous project).
Choose ObjectJ> Show Project Window and select the Objects panel.
Here you can modify names and appearnace your item types.
Use Show Object Label to show/hide numerical labels.
The demo project includes some simple embedded macros.
You can change this text by choosing ObjectJ> Show Embedded Macros
and change the terms Small , Big, Double so they match your new item types,
or adjust appearance of text labels.
Click button Install in ObjectJ Menu, and save the project via ObjectJ> Save Project
Link Images to be marked via ObjectJ> Linked Images.., or by dragging them into the panel for linked images.