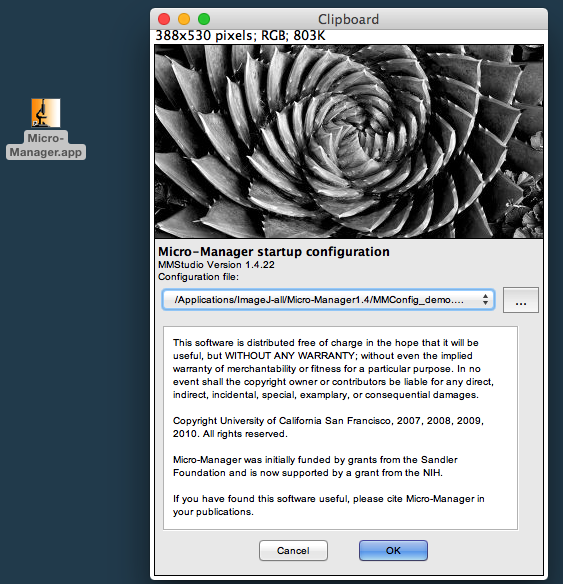
Fig. 1: Start-up window shows used config file
https://sils.fnwi.uva.nl/bcb/BX_2016/MD/bx_macros.html
N.Vischer, 08-Feb-2017
see also: First-time installation and download
Basically, the macro set provides a two-step dialog (settings and exposures), and then provides shortcut keys such as "Grab next channel [F1]" to fill a hyperstack of the desired structure.
Fig. 1: Start-up window shows used config file
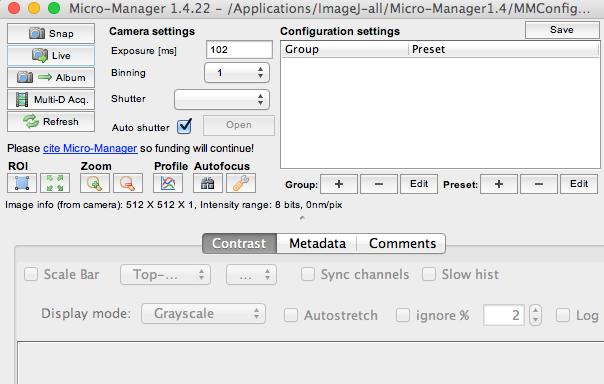
Fig. 2: Micro-Manager window
You can optionally play with buttons "Snap" and "Live", which will open the "Snap" window and take pictures with the selected Exposure [ms]. But during normal operation, it is enough that the "Snap" window exists and "Live" is switched off.
Now let us use the installed macros to capture image sequences in an organized way. Via key strokes, images will be grabbed and copied from the 'Snap' window to a hyperstack with the desired structure, using individual shutter behaviour and exposure times per channel.
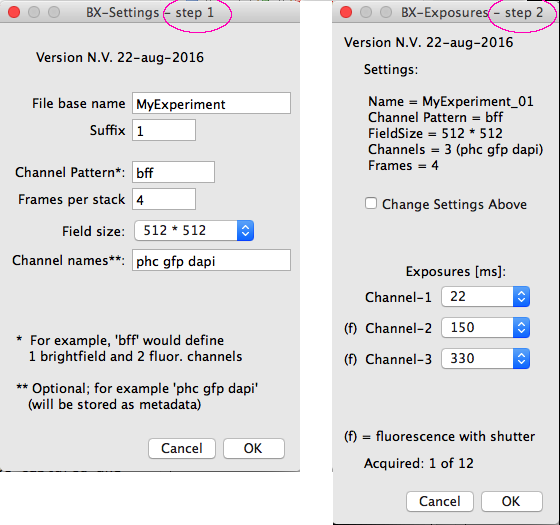
Fig. 3: Two-step dialog, acquisition structure (left) and exposures (right)
choose a Channel Pattern consisting of letters b (=brightfield) and f (=fluorescence). For example, the pattern 'bff' will create a 3-channel stack, where the UV shutter will be opened only for the second and third snapshot.
choose Field Size (currently 2048*2048 or 1300*1300). The latter option will only store the central part of the Snap window, useful if the peripheral part of the sensor chip is poorly illuminated in case of fluorescence images.
choose the Number of Frames. For example, if 3 channels and 8 frames are selected, an acqueisition stack of 3*8 = 24 images will be created to receive the individual snaps. With a larger number of frames per stack we have to handle less files.
Click OK to leave the first and enter the second step of the dialog (Fig 3, right), and select the desired exposure times.
Subsequent calls of "Dialog [F5]" will lead directly to "Dialog step 2" with the exposure times, but you can go back to step 1 by checking "Change Settings Above". In this case, you may be asked to save any (half full) acquired stack.
Now you can collect snapshots in the desired sequence. Choose menu Plugins> Macros> Grab Next Channel [F1] or press key F1. An image will be captured and and populate the current acquisition stack. The 'Acquisition Stack" shows at the top the exposure time and channel name, which will be saved as metadata (see Fig 5).
Zooming: when the first channel is acquired, the zoom factor is optimized to show the entire image content on a maximal visible area at the left of the screen. Pressing the "+" key will zoom in at the vicinity of the cursor. You can choose go back to show the entire image via Plugins> Macros> Zoom to Fit [0] or press key 0 (zero).
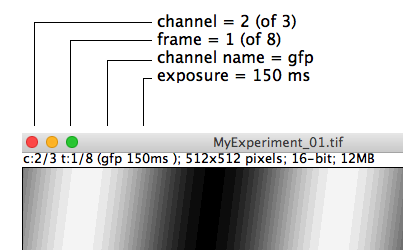
Fig.5: Channel, frame and exposure are shown at the top of the image
You can redo the most recent acquisition by choosing Plugins> Macros> Redo Channel [F2] or press key F2.
There are commands to operate the shutter: Plugins> Macros> Open Shutter [F6] and Plugins> Macros> Close Shutter [F7]. The shutter can also be operated via the two hardware buttons on the black shutter box.
Rather than using 'StartupMacros.txt' described above, you can use your own macros with different defaults for channel names and exposure times.
Create your own macro file as follows:
- Choose "Plugin> Macros> Startup Macros..."
- Choose menu File> Save As...>" and save it in your personal folder e.g. as "Modified-BX-macros.txt".
- change the text by entering different settings
- note that declarations end with comma, not semicolon
- also change the version text
- Save the file again with the changes.
- For installing your personal macro file, just choose menu "Plugins> Macros> Install..." and thus replace the current settings with your own ones.
Alternatively, you could simply drag your personal macro file from the Finder/Explorer onto the ImageJ main window, which then shows something like "8 macros installed".
Below is a copy of the current default values:
// begin user-changeable values
    mVersion = "Version N.V. 22-aug-2016",
    defaultField = 2048,  //2048 or 1300
    expArray = split("22 150 330 100 100 100 100 100 100 100"),
    gChnPattern = "bff",
    gFrames = 4,
    gChannelNames = "",//example: "phc gfp dapi"
    gName = "Collection",
// end user-changeable values
Download adresses: https://sils.fnwi.uva.nl/bcb/BX_2016/download/